

Layers and blend modes
Every asset in Hexcalibur paints on layers - the same idea you’d recognize from Photoshop or Aseprite. Layers stack from bottom to top; each layer can be hidden, locked, made partially transparent, or composited with a blend mode.
What a layer holds
Section titled “What a layer holds”A layer is a single canvas-sized image - it has the same width and height as the asset itself. Painting on layer A doesn’t touch layer B. Reordering, hiding, or deleting a layer doesn’t destroy what’s on the others.
The pack autosaves the entire layer stack on every stroke, so nothing is ever in a “saved vs unsaved” limbo - what you see in the layers panel is what’s on disk (and on the cloud if you’re on Pro).
Layer controls
Section titled “Layer controls”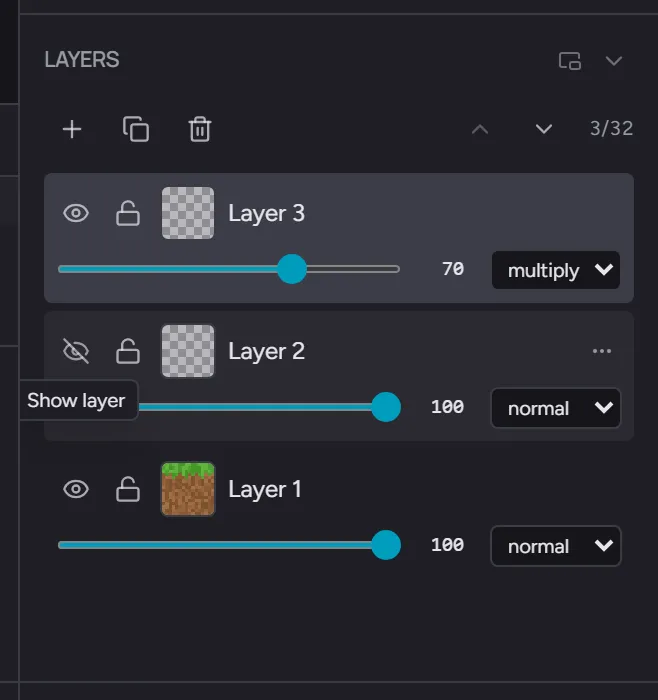
Each row in the Layers section of the Studio panel is one layer:
- Eye icon: show or hide. A hidden layer is preserved but excluded from compositing and from export.
- Lock icon: prevent edits. A locked layer can’t be painted on or deleted by mistake; useful for finished elements.
- Opacity slider: 0-100%. Multiplies the layer’s pixel alpha before compositing.
- Blend dropdown: the blend mode (see below).
- Drag handle: drag a row to reorder. Multi-select via Ctrl/ Cmd + click or Shift + click for range, then drag the block as a single unit.
Right-click any row for the full menu - Duplicate layer,
Rename Layer, Export as PNG, the Merge group, and Delete layer.
The kebab ⋯ icon opens the same menu.
Adding, deleting, merging
Section titled “Adding, deleting, merging”+adds a new empty layer above the active one- The trash icon (or
Deletewhile hovering the layers panel) removes the selected layers - Merge layers (
Merge N layersin the menu) collapses a multi-selection of layers into one; the result sits in the lowest selected layer’s slot. Shown when 2+ are selected. - Merge visible collapses every visible layer into one; hidden layers stay where they are. Shown when 2+ visible.
- Flatten image collapses every layer into one, dropping hidden layers entirely. Shown when the asset has 2+ layers.
Blend modes
Section titled “Blend modes”The blend mode controls how a layer’s pixels combine with the composite of every layer below it.
- Normal - the layer’s pixels replace what’s underneath at the layer’s opacity. The default; what you usually want.
- Multiply - the layer’s color values multiply with what’s underneath. Darkens. Useful for shadows, AO passes, or tinting.
- Screen - the inverse of multiply. Lightens. Useful for highlights and glows.
- Overlay - combines multiply and screen depending on the underlying brightness. Punches up contrast.
- Darken - keeps the darker pixel between the layer and what’s underneath, channel by channel. Useful for tightening shadows without losing the lit areas.
- Lighten - keeps the lighter pixel between the layer and what’s underneath. Useful for adding rim light or highlights without affecting darker regions.
Blend modes operate on the composite below the layer, not on the layer immediately beneath. Re-ordering a layer changes what it composites against.
Per-face layer stacks (block textures)
Section titled “Per-face layer stacks (block textures)”For block-texture assets, layers behave slightly differently depending on whether the asset is in mirror or face-independent mode:
- Mirror mode: one shared layer stack. Every face shows the same composite.
- Face-independent mode: each face has its own layer stack. Switching the active face in the bottom face selector also switches which layer stack the layers panel shows.
See Packs and assets for the full face-independence model.