

Palettes and the lock workflow
A palette is the set of colors associated with a pack. Every asset in the pack shares the same palette. The palette can come from a preset, be extracted from your existing canvas, generated from a single seed color, or built up by hand one swatch at a time.
Once you have a palette, you can lock it - and from then on every stroke snaps to the nearest palette color, even if your brush is set to something else.
Where palettes come from
Section titled “Where palettes come from”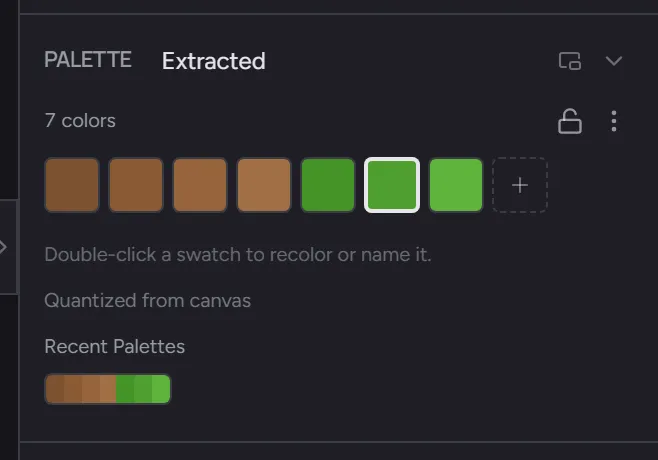
The Palette section of the Studio panel has a ⋯ menu with
these generators:
- Extract from Canvas. Collects every distinct color already painted in the pack into a fresh palette. No quantization - one swatch per unique color. Use this when you want a palette that reflects exactly what you’ve painted.
- Quantize from Canvas. Median-cut quantizes the painted pixels in the active asset down to a target color count (default 16). Use this when an imported image needs to fit a small palette.
- Generate from Brush Color. Builds an HSL ramp from your current brush color. Useful for monochrome work or as a starting point you’ll edit by hand.
- Load preset. Pico-8, Game Boy DMG, Endesga 32, Apollo, and the Minecraft palette all ship as one-click loads.
- From library. Any palette you’ve saved to your user library is available here.
- Save Palette to Library. Stores the current palette in your library for reuse across packs.
- Clear Palette. Removes every swatch from the current palette.
You can also build a palette one swatch at a time: pick a color
in the Color section, click the trailing + in the swatch grid
to add it.
Your palette library
Section titled “Your palette library”Palettes you save are kept in a personal library you can reuse
across every pack. Save the current palette with Save Palette to
Library in the ⋯ menu, and apply any saved palette back to a
pack from the From library submenu.
For building, renaming, reordering, and organizing your library - or auto-generating new palettes from color-theory schemes - open the Palette Manager. On Pro, the library also syncs across your devices.
Lock the palette
Section titled “Lock the palette”Click the padlock in the Palette section header. While locked:
- Every stroke commits the nearest palette color, not the literal brush color
- Adding a new color to the palette via the trailing
+adds it to the locked set - Removing a swatch from the palette also removes it from the pack - every existing pixel of that color gets re-quantized to the nearest remaining palette color
Locking is the workflow that keeps a tileset visually consistent without you needing to remember the exact hex codes. Pick once, lock, then paint freely.
Re-quantize on lock
Section titled “Re-quantize on lock”The first time you lock a non-empty palette, Hexcalibur snaps every existing pixel in every asset of the pack to the nearest palette color. This happens once, in place, with undo. If the result isn’t what you want, undo and adjust the palette before re-locking.
For larger packs, the re-quantize runs in a Web Worker so the editor stays responsive.
Swatch interactions
Section titled “Swatch interactions”Inside the swatch grid:
- Click a swatch to set it as your brush color
- Alt + click removes the swatch from the palette
- Right-click also removes (same effect, different muscle memory)
- Drag to reorder
- The swatch matching your current brush color gets an inset ring so you can see at a glance which palette entry is active
Recent palettes
Section titled “Recent palettes”Below the swatch grid, a strip shows recent palettes you’ve used across any pack. Click one to apply it to the current pack. Useful for re-using a palette across related packs (a cobblestone pack and a brick pack might share a stone-tones palette).
Related
Section titled “Related”- Layers and blend modes
- Palette section reference
- Palette Manager - the library workspace + scheme generator