

Layers panel
The Layers section sits at the bottom of the editor’s right panel. Every row is one layer in the active asset, top of the panel = top of the stack.
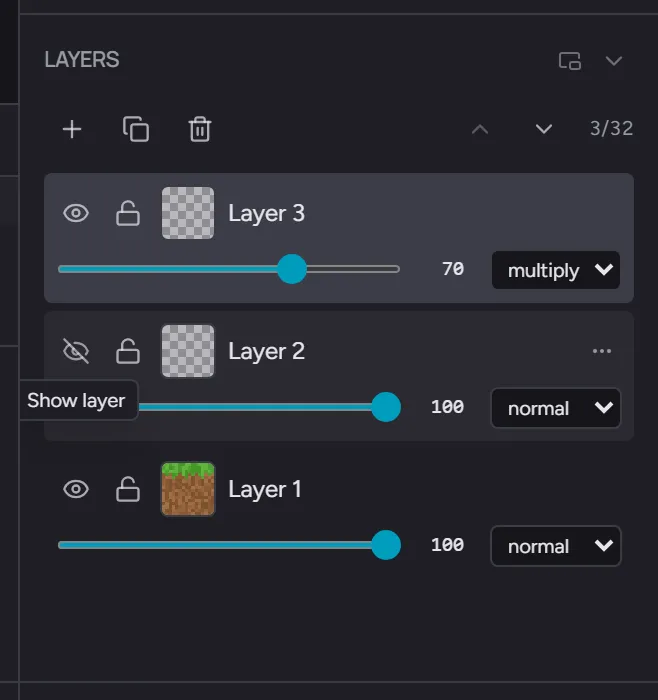
Per-row controls
Section titled “Per-row controls”Reading the row left to right:
- Eye - visibility toggle. Hidden layers don’t composite and don’t appear in export.
- Lock - prevent edits. A locked layer can’t be painted on or deleted.
- Thumbnail - a 32×32 preview of the layer’s pixels on the frame you’re viewing.
- Film icon - only on animated assets, and only when this layer has no artwork on the current frame but does have some on another one. Hover it to see which frames. Without it, a layer whose art lives on a different frame would look exactly like an empty layer.
- Name - double-click to rename inline.
Entercommits,Esccancels. - Opacity slider + percentage - 0-100%, multiplied with each pixel’s alpha at composite time.
- Blend dropdown - Normal, Multiply, Screen, Overlay, Darken, Lighten.
- Drag handle - hold and drag to reorder.
Right-click anywhere on a row, or click the kebab ⋯ icon, for
the full menu: Duplicate layer, Copy layer, Paste layer, Rename
Layer, Export as PNG, Merge layers (when 2+ are selected), Merge
visible (when 2+ visible layers exist), Flatten image, and Delete
layer. Bulk labels swap in when the row is part of a
multi-selection (“Duplicate N layers”, “Export N layers”, “Delete
N layers”).
Copying a layer to another asset
Section titled “Copying a layer to another asset”Duplicate layer copies a layer within the asset you’re in. To take one somewhere else, use Copy layer and Paste layer - in the row’s right-click menu and kebab, and in the top-bar Layer menu.
Copy layer takes the whole layer, not just what’s under a selection: every frame of it, plus its name, opacity, and blend mode. Then open any other asset - in this pack or another one - and Paste layer drops it on top of that asset’s stack.
Things worth knowing:
- The two assets must be the same canvas size. Paste tells you if they aren’t.
- The copy sticks around. Paste as many times, into as many assets, as you like. It clears when you reload.
- If the destination already has a layer with that name, the pasted one gets ” copy” added.
- Animated layers: a layer with artwork on one frame lands on whichever frame you’re viewing. A layer animated across several frames maps onto the destination’s frames in order - and if the destination has fewer frames, the extra ones are left behind rather than added for you. Add the frames you need and paste again.
- Tile layers paste as ordinary paint layers holding the tiles’ pixels. A tile layer points at its own pack’s tiles, which wouldn’t mean anything in a different pack.
There’s no keyboard shortcut for either - Cmd/Ctrl + C and
Cmd/Ctrl + V belong to the
marquee clipboard,
which copies pixels rather than layers.
Adding and deleting
Section titled “Adding and deleting”- The
+button at the top adds a new empty layer above the active one - The trash icon removes the selected layers
Deleteremoves the selected layers when your cursor is over the panel - the shortcut is hover-routed so a stray press while painting can’t lose work
After a delete, the active layer falls back to the row immediately above the lowest deleted index - same convention as Photoshop.
Multi-select and bulk actions
Section titled “Multi-select and bulk actions”- Click selects a single row
Cmd/Ctrl + Clicktoggles the row in or out of the multi-selectionShift + Clickrange-selects from the active row to the clicked row- Drag the multi-selection to reorder all selected rows together as one block
- Right-click the multi-selection for bulk actions (delete, duplicate)
The active row keeps a brand teal highlight so it’s distinct from a multi-selection.
Reordering
Section titled “Reordering”Drag any row by its handle to a new position. The other rows shift smoothly to make space; release to commit.
Multi-selected rows move as a single block - the relative order inside the block is preserved.
Merging
Section titled “Merging”- Merge N layers flattens a multi-selection of layers into one. The result sits in the lowest selected layer’s slot. Shown in the kebab when two or more layers are selected.
- Merge visible collapses every visible layer into one; hidden layers stay where they are. Shown when at least two layers are visible.
- Flatten image collapses every layer (visible and hidden) into one. Hidden layers are dropped entirely. Shown when the asset has two or more layers.
All three live in the right-click menu and the kebab ⋯. Each
is a single undo entry.
Per-face layer stacks
Section titled “Per-face layer stacks”For block-texture assets in face-independent mode, each face has its own layer stack. The Layers panel shows the stack for the currently active face - switch faces in the bottom face selector and the panel switches with you.
In mirror mode (the default), all six faces share one layer stack.
Related
Section titled “Related”- Layers and blend modes
- Tool rail
- Customizing the Studio panel - show/hide, resize, or detach the Layers section into a floating window